Configuring COM+
Configuring COM+
December 2003
Summary: This article explains how you can leverage the COM+ Admin Library to automate the configuration and deployment of COM+ Applications.
Contents
Download:
Sample Application
Introduction
Exporting COM+ Applications
COM+ Admin Library
Installing an Application
Creating a new Application
Configuring Components
Introduction
COM+ is a technology that provides a set of infrastructure services to components that you can leverage in your applications through some “simple” (not at all) concepts Interception and Contexts. These services include:- Distributed Transactions
- Queued Components (one of my favorites)
- Code Access and Role Based Security
- SOAP invocation
- JIT Activation
- Object Pooling
- And more…
If you want to learn more about COM+ Services there are several books that I can recommend you, but you can start with some MSDN info: Understanding Enterprise Services (COM+) in .NET and COM+ (Component Services)
To be able to use the COM+ Services, you need to configure them inside what is known as the COM+ Catalog. One easy way to do this is using the COM+ Component Services Snap-in that comes with Windows where you can configure most of the settings for COM+.
Exporting COM+ Applications
Component Services or more specifically the COM+ Catalog comes with the option to create an MSI to distribute your COM+ Applications and set-up all the component settings automatically for you.There are two options to export your application when using the wizard:
- Server Application. This option will export the application including the components and the settings to be configured in another server (this is useful when moving applications from Dev environment to Production)
- Client Proxy. This will export only proxies for your components so that you can consume them from a remote machine.
After running the wizard it will generate two files for you, samples.msi and samples.msi.cab. Both files are required to install the application.
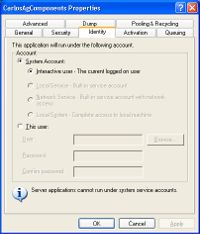
This means that every time you configure your application you will need to manually verify that the settings are correct for the user.
Fortunately this is not the only choice and you can do a small program/script to configure this and any other setting of your components using the COM+ Admin library.
COM+ Admin Library
The COM+ Admin Library is a set of objects that allows you to interact with the COM+ Catalog the same way you can do it using the Component Services UI.Every object in the COM+ Admin Library is represented for one of two objects:
- COMAdminCatalogObject
- COMAdminCatalogCollection
To start working with the COM+ Catalog you need to create an instance of the class COMAdmin.COMAdminCatalog.
This object comes with methods that allow you to read and write settings on the catalog either locally or remotely (using the Connect method).
Some of the most important methods in this class are:
- Connect. Allows you to connect to a COM+ Catalog in another machine.
- ExportApplication. Allows you to generate the MSI just as the Export wizard does.
- GetCollection. Allows you to query the objects that are configured.
- ImportComponents. Allows you to install new components.
- InstallApplication. Allows you to install the MSI generated by the Export method.
- ShutdownApplication. Allows you to stop a Server application.
Installing an Application
InstallApplication is the first of the methods that might be incredibly useful when deploying applications, since it allows you to specify the user credentials under this application should be running.You just need to specify the path to the MSI file generated by the export wizard.
Dim catalog As COMAdmin.COMAdminCatalog
Set catalog = New COMAdmin.COMAdminCatalog
catalog.InstallApplication _
"e:\articles\complus\sample.msi", _
"e:\articles\complus\bin\", _
1, _
"carlosag\administrator", _
"My@Password"
Set catalog = New COMAdmin.COMAdminCatalog
catalog.InstallApplication _
"e:\articles\complus\sample.msi", _
"e:\articles\complus\bin\", _
1, _
"carlosag\administrator", _
"My@Password"
The easiest thing to do to deploy your applications is using the MSI that is exported by the Component Services explorer and using the previous code probably in a vbs script or .exe application to set the Identity and the folder to store your application components.
However there are some times where you want to gain more control over the whole setup progress and that’s where you start using other objects and collections of the Admin library.
Creating a new Application
To create a new application (or any other object inside the catalog) using code is quite simple, you just need to get a reference to the correct collection, call the Add method on the collection and set the desired settings on the object and at the end persisting the changes to the catalog by calling SaveChanges method.For example, the following code creates a new application called SampleApp, and sets some of the most common settings.
Dim catalog As COMAdmin.COMAdminCatalog
Dim applications As COMAdmin.COMAdminCatalogCollection
Dim application As COMAdmin.COMAdminCatalogObject
Set catalog = New COMAdmin.COMAdminCatalog
Set applications = catalog.GetCollection("Applications")
Call applications.Populate
Set application = applications.Add()
' ID is an arbitrary GUID, that you can create using uuidgen
application.Value("ID") = "{da2d72e3-f402-4f98-a415-66d21dafc0a9}"
application.Value("Name") = "SampleApp"
application.Value("Activation") = COMAdmin.COMAdminActivationOptions.COMAdminActivationLocal
application.Value("ApplicationAccessChecksEnabled") = COMAdmin.COMAdminAccessChecksLevelOptions.COMAdminAccessChecksApplicationComponentLevel
application.Value("Description") = "Sample Application"
application.Value("Identity") = "YourMachine\administrator"
application.Value("Password") = "YourPassword"
application.Value("RunForever") = True
Call applications.SaveChanges
Set application = Nothing
Set applications = Nothing
Set catalog = Nothing
To see all the properties that you can set to an application and the applications collection itself see this: Applications Collection
Adding a new dll
Adding a new DLL to an application is as simple as calling InstallComponent and giving it the path to the dll and the type library (in this case both live in the same dll so it is not required to send both values).
catalog.InstallComponent("SampleApp", "E:\Articles\ComPlus\Test\ComDll.dll", "", "")
Configuring Components
To configure components is a little bit more complicated since you need to grab a reference to the application to be able to read the components collection as shown in the hierarchy of objects above or you need to do a query to get the components of the application you are interested. For example, the following code looks for the application previously created issuing a query for the components of the application with the specified GUID. Then it sets the transaction setting to be required.
Dim catalog As COMAdmin.COMAdminCatalog
Set catalog = New COMAdmin.COMAdminCatalog
Dim components As COMAdmin.COMAdminCatalogCollection
Dim queryParams(0)
queryParams(0) = "{DA2D72E3-F402-4F98-A415-66D21DAFC0A9}"
Set components = catalog.GetCollectionByQuery("Components", queryParams)
Dim component As COMAdmin.COMAdminCatalogObject
components.Populate
Set component = components.Item(0)
component.Value("Transaction") = COMAdmin.COMAdminTransactionOptions.COMAdminTransactionRequired
Call components.SaveChanges
Set component = Nothing
Set components = Nothing
Set catalog = Nothing
To see a list of all the properties and their meaning that you can set for components see:Components Collection
Set catalog = New COMAdmin.COMAdminCatalog
Dim components As COMAdmin.COMAdminCatalogCollection
Dim queryParams(0)
queryParams(0) = "{DA2D72E3-F402-4F98-A415-66D21DAFC0A9}"
Set components = catalog.GetCollectionByQuery("Components", queryParams)
Dim component As COMAdmin.COMAdminCatalogObject
components.Populate
Set component = components.Item(0)
component.Value("Transaction") = COMAdmin.COMAdminTransactionOptions.COMAdminTransactionRequired
Call components.SaveChanges
Set component = Nothing
Set components = Nothing
Set catalog = Nothing
Following this pattern you can pretty much set whatever you want inside the catalog, querying for a child collection of an object specifying its id. Then changing any values you need and finally calling SaveChanges on the collection.
Summary
COM+ includes a library to ease the task of deploying and configuring components. Using this library you can automate any configuration settings and avoid many errors while setting up your application. As you can see it is very easy to use and can be programmed in VB6, script files, C# or any language.Carlos Aguilar Mares © 2017