Creating your own Visual Studio Project Template
Creating your own Visual Studio Project Template
March 2004
Summary: This article explains how you can customize Visual Studio to have your own Project Template
Contents
Introduction
Creating the VSDIR
Creating the VSZ
Adding Items to the Project
Configuring Components
Introduction
Visual Studio is a great editor and comes with a lot of templates pre-defined to fit almost all needs. However in some cases you need more specific things or you could save some time by genearting some default content that you use.VS has an extensibility story so robust that it can allow you to do almost anything you can imagine with it.
In this article we are just going to touch the simplest approach on generating your own project template by leveraging the existing infrastructure of the VS Wizard, later in the month I might write something on how to write your own wizard, to customize even further providing your own UI and more powerful options.
Customizing the VS Wizard requires the following steps:
- Creating or modifying a VSDIR file
- Creating a VSZ file
- Customizing the default javascripts
- Creating your file templates
Creating the VSDIR file
Visual Studio uses VSDIR files to load the information of the Add Items dialog and the New Project dialog box. The VSDIR provides information about the items these dialog boxes display, such as the names, descriptions, and the icon to display.You can have multiple VSDIR files in a single directory; however, generally one VSDIR file is used to contain information for multiple wizards, folders, or templates.
http://msdn.microsoft.com/en-us/library/2sc7ft4a(VS.71).aspx
Creating the VSDIR file
- Go to the path
- Create a file called MyTemplate.vsdir with the following content:
MyTemplate.vsz|{FAE04EC1-301F-11d3-BF4B-00C04F79EFBC}|My Template|10|This is a project template for creating my own things|{FAE04EC1-301F-11d3-BF4B-00C04F79EFBC}|4548||MyTemplate
Note: This is a one singe line file.
|
Field |
Meaning |
|
RelPathName |
Name of the .vsz file
for the wizard. |
|
{clsidPackage} |
Optional GUID representing
a product that has a DLL containing localized resources. |
|
LocalizedName |
Optional name of the
wizard as it will appear in the Add Item dialog can be a string or a resource identifier
of the form: "#ResID."
|
|
SortPriority |
An integer representing
the relative priority of the wizard, with 1 being highest. Determines the sort order
of items in the dialog. |
|
Description |
Localizable description
of the template or wizard as it will appear in the Add Item dialog box can be a string
or a resource identifier of the form: "#ResID."
|
|
DLLPath or {clsidPackage} |
Used to load an icon
for the wizard from a .dll or .exe file. Specify either the full path to the .dll or
.exe, or a GUID of a product that has a .dll file containing localized resources. |
|
IconResourceId |
Optional resource identifier
within the .dll file that determines the icon to display. If no icon is defined, the
shell substitutes the default icon for a file with the same extension as the item. |
|
Flags |
A group of flags that
disable or enable the Name and Location fields on the Add Item dialog box. The flags
can have the following values:
Space (" "): enable file name 8192: disable file name |
|
SuggestedBaseName |
The default name for
the wizard either a string or a resource identifier of the form: "#ResID." If necessary,
the shell appends the base value with an integer to make the name unique. For example,
the shell might change MyFile.asp to MyFile1.asp.
This default name is shown in the name field in the dialog. |
Creating the VSZ file
http://msdn.microsoft.com/en-us/library/b48hhx46(VS.71).aspx- Go to the path
- Create a file called MyTemplate.vsz with the following content:
VSWIZARD 7.0
Wizard=VsWizard.VsWizardEngine.7.1
Param="WIZARD_NAME = MyTemplate"
Param="WIZARD_UI = FALSE"
Param="PROJECT_TYPE = CSPROJ"
|
Part |
Meaning |
|
VSWIZARD |
Identifies the wizard
interface the wizard will be expected to implement. |
|
Wizard |
The ProgID of the wizard. |
|
Param |
Custom parameters that
get passed to the wizard upon execution. You can have any number of custom parameters.
Each parameter is contained on a separate line. |
In this case we are using the already implemented VsWizard object. This by default will look for a folder to add the items and some scripts that can extend the functionality.
But at this time you can already launch VS.NET 2003 and be able to see a new Project called MyTemplate. You can notice that you get the same icon as the “Console Application”, which is the one I chose (4548) to simplify the sample, and also notice the suggested name for the project as well as the description,
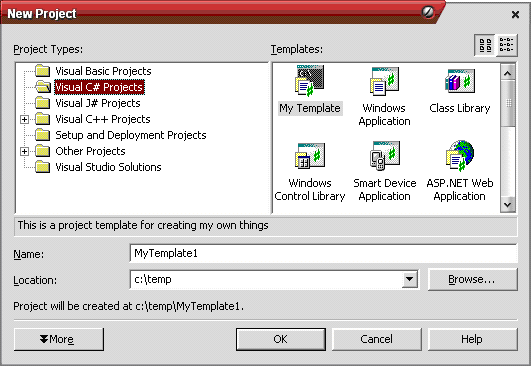
Note: If you try to use this new template it will show an error saying it couldn’t find the scripts. We will work to finish that in the next section.
Adding Items to the project
The default wizard in Visual Studio uses the name of the template to look in the folder <Program Files>\Microsoft Visual Studio .NET 2003\VC#\VC#Wizards for the items to add and the script to extend the functionality of the project.Create the Script
Create the folder:<Program Files>Microsoft Visual Studio .NET 2003\VC#\VC#Wizards\MyTemplate
Create the folder
<Program Files>\Microsoft Visual Studio .NET 2003\VC#\VC#Wizards\MyTemplate\Scripts\1033
Inside this folder create a file called default.js with the following content:
function OnFinish(selProj, selObj) {
var oldSuppressUIValue = true;
try {
oldSuppressUIValue = dte.SuppressUI;
var strProjectPath = wizard.FindSymbol("PROJECT_PATH");
var strProjectName = wizard.FindSymbol("PROJECT_NAME");
var strSafeProjectName = CreateSafeName(strProjectName);
wizard.AddSymbol("SAFE_PROJECT_NAME", strSafeProjectName);
var proj = CreateCSharpProject(strProjectName, strProjectPath, "default.csproj");
var InfFile = CreateInfFile();
if (proj) {
AddReferencesForClass(proj);
AddFilesToCSharpProject(proj, strProjectName, strProjectPath, InfFile, false);
}
proj.Save();
}
catch(e) {
if( e.description.length > 0 )
SetErrorInfo(e);
return e.number;
}
finally {
dte.SuppressUI = oldSuppressUIValue;
if( InfFile )
InfFile.Delete();
}
}
function GetCSharpTargetName(strName, strProjectName) {
var strTarget = strName;
switch (strName) {
case "File1.cs":
strTarget = "Class1.cs";
break;
}
return strTarget;
}
function DoOpenFile(strName) {
var bOpen = false;
switch (strName) {
case "Class1.cs":
bOpen = true;
break;
}
return bOpen;
}
function SetFileProperties(oFileItem, strFileName) {
if(strFileName == "File1.cs") {
oFileItem.Properties("SubType").Value = "Code";
}
}
This script will be executed when creating the project and tells the wizard exactly
what you what your project will do. I will explain the meaning of all this code
in the next section, but for now, just copy/paste this code.var oldSuppressUIValue = true;
try {
oldSuppressUIValue = dte.SuppressUI;
var strProjectPath = wizard.FindSymbol("PROJECT_PATH");
var strProjectName = wizard.FindSymbol("PROJECT_NAME");
var strSafeProjectName = CreateSafeName(strProjectName);
wizard.AddSymbol("SAFE_PROJECT_NAME", strSafeProjectName);
var proj = CreateCSharpProject(strProjectName, strProjectPath, "default.csproj");
var InfFile = CreateInfFile();
if (proj) {
AddReferencesForClass(proj);
AddFilesToCSharpProject(proj, strProjectName, strProjectPath, InfFile, false);
}
proj.Save();
}
catch(e) {
if( e.description.length > 0 )
SetErrorInfo(e);
return e.number;
}
finally {
dte.SuppressUI = oldSuppressUIValue;
if( InfFile )
InfFile.Delete();
}
}
function GetCSharpTargetName(strName, strProjectName) {
var strTarget = strName;
switch (strName) {
case "File1.cs":
strTarget = "Class1.cs";
break;
}
return strTarget;
}
function DoOpenFile(strName) {
var bOpen = false;
switch (strName) {
case "Class1.cs":
bOpen = true;
break;
}
return bOpen;
}
function SetFileProperties(oFileItem, strFileName) {
if(strFileName == "File1.cs") {
oFileItem.Properties("SubType").Value = "Code";
}
}
Create the Templates
Create the folder:
<Program Files>Microsoft Visual Studio .NET 2003\VC#\VC#Wizards\MyTemplate
Create the folder
<Program Files>\Microsoft Visual Studio .NET 2003\VC#\VC#Wizards\MyTemplate\Templates\1033
Iniside this folder create a file called Templates.inf with the following single line on it:
File1.cs
Iniside this folder create a file called File1.cs with the following code:
namespace [!output SAFE_NAMESPACE_NAME]
{
using System;
/// <summary>
/// [!output SAFE_CLASS_NAME].
/// </summary>
class [!output SAFE_CLASS_NAME] {
/// <summary>
/// The main entry point for the application.
/// </summary>
static voidMain (string[] args)
{
//
// TODO: Add code to start application here
//
}
}
}
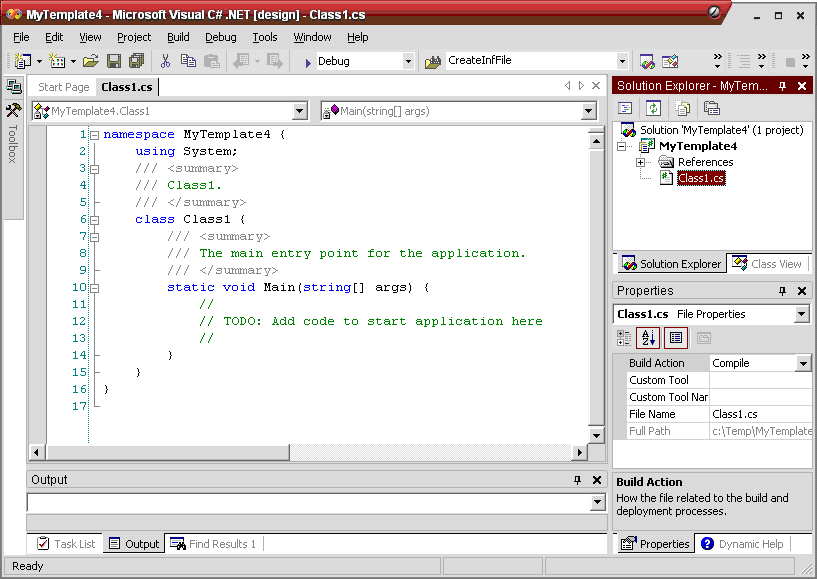
At this point everything should work, and you should be able to create a project
of your new template.using System;
/// <summary>
/// [!output SAFE_CLASS_NAME].
/// </summary>
class [!output SAFE_CLASS_NAME] {
/// <summary>
/// The main entry point for the application.
/// </summary>
static void
//
// TODO: Add code to start application here
//
}
}
}
What the javascript code does
OnFinish is called when the user press finish in the New Project dialog, inside this function, the only thing we do is read some of the “environment variables” that Visual Studio will pass us, including the path of the project and the name.Then we call a function called CreateCSharpProject; this function is shipped inside common.js (<Program Files>\Microsoft Visual Studio .NET 2003\VC#\VC#Wizards\1033) that does some default stuff like closing the solution if required (you can set the CLOSE_SOLUTION symbol for this before calling this method), then takes the specified TemplateFile, in this case default.csproj that setups the typical C# project with a Debug and Release folder inside the bin, etc. You can change this by creating another .csproj file inside the folder <Program Files>\Microsoft Visual Studio .NET 2003\VC#\VC#Wizards) and customizing it to cover your needs, in my case I have changed a couple of lines to add Setup releases with a new Setup & Deployment Project as well as other debugging information.
After creating the project, we call the CreateInfFile function (again in the common.js) that reads the Templates.inf file inside the Templates folder of the project and creates a copy in the %Temp% path, and returns a TextStream (from the Scripting.FileSystemObject ActiveX library).
Then we call AddReferencesForClass (common.js) that will add the references to System, System.Data and System.XML assemblies.
At the end we just call AddFilesToCSharpProject that will add the files inside the TextStream with the Templates.inf data.
One thing to notice about this method is that it will call a function GetCSharpTargetName to determine the real name of each file. This is the reason we added that function to our script and just for demonstration purposes we “rename” the file1.cs to Class1.cs, but we could as well do nothing and return the same name.
Once the file has beed added it will call SetFileProperties to set the correct properties for each file, in this case since it is code we are adding we set the SubType to code.
After this it will call DoOpenFile to determine if the file should be opened by default in the editor.
Summary
Customizing Visual Studio can be as easy as copying some files and adding a few others, or can be as powerful as creating your own dialogs, intercepting events in the editor, exposing custom actions, toolbars, buttons and more.In this article we used the simplest mechanism to extend the VS designer to create our own Project Template that adds our default content.
This sample can be extended using the javascript common code to do a lot of things, but I wanted to keep as simple as possible.
In a future article I will show how to create a new project template that intercepts events and creates a new Wizard to create projects in VS.
Carlos Aguilar Mares © 2017